Heel Hook BJJ: Inside, Outside & Safety Guide

The heel hook is the most powerful submission in no-gi BJJ.
It is also the most dangerous to train. Unlike a choke or an armbar — where pain arrives before serious injury — the heel hook can destroy knee ligaments before the person being attacked even feels significant discomfort. By the time the pain registers, the ACL, MCL, or LCL may already be torn.
That is not a reason to avoid it. In modern no-gi BJJ and submission grappling, the heel hook is essential knowledge. If you do not understand it, you will be submitted by it — and you will not know how to defend it safely. At ADCC 2024, over 60% of matches ended with leg attacks.
But understanding it requires more than just technique. It requires the right mindset, the right training protocols, and a clear grasp of when and how to apply it safely. This guide covers all of it.
⚠️ Safety first — read before anything else | Heel hooks can cause permanent knee damage before pain occurs. Tap early — well before discomfort becomes pain.
Never drill heel hook finishes at speed or with force in training. Slow application only.
Always confirm your partner’s experience level before training heel hooks with them.
If caught in a heel hook and unsure which direction to escape — tap immediately. Spinning the wrong way can snap your own knee.
The gi creates friction that accelerates damage. Most academies ban heel hooks in gi training entirely for this reason.
Table of Contents
What is the heel hook?
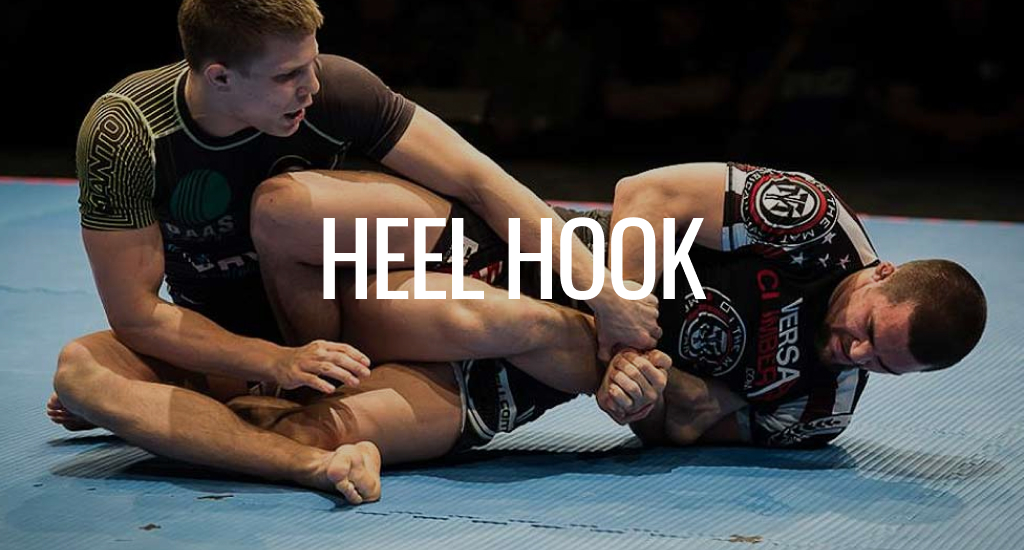
A heel hook is a leg lock submission that attacks the knee joint by applying rotational force through the foot and lower leg. You trap your opponent’s leg in an entanglement, hook their heel with your wrist or forearm, trap their toes in your armpit, and rotate your body. Since the leg is trapped and cannot move, the rotational torque travels up through the lower leg and strikes the knee — twisting the ligaments past their natural range of motion.
There are two primary types:
- Inside heel hook — rotates the heel toward the opponent’s body. Applied primarily from the saddle or honey hole position. More powerful and more dangerous.
- Outside heel hook — rotates the heel away from the opponent’s body. Applied primarily from standard ashi garami or 50/50. Still extremely dangerous.
Both versions attack the same structures — the knee ligaments (ACL, MCL, LCL) and the knee capsule — through different rotation directions.
Success rate data: According to BJJ Graph’s competition analysis, heel hook success rates vary significantly by experience level — approximately 20% for beginners, 35% for intermediate practitioners, and 55% for advanced grapplers. The gap between levels reflects the importance of positional control and entry mechanics rather than raw strength.
Why heel hooks are uniquely dangerous
Every submission in BJJ has a safety mechanism built in by anatomy. Chokes compress the carotids — you feel the pressure building and tap. Armbars hyperextend the elbow — pain arrives clearly before damage. The kimura rotates the shoulder — discomfort precedes injury.
The heel hook is different. There is almost no warning signal before serious damage occurs.
The rotational force acts on the knee’s ligaments — structures that have very little nerve sensitivity compared to joint surfaces or muscles. The ACL in particular has limited pain receptors. A person can be in a heel hook with significant ligament stress and feel only mild discomfort. Then — very suddenly — the ligament tears. The damage is done before the tap happens.
As Lachlan Giles — one of the world’s leading no-gi competitors and coaches — has explained in his instructional work: there is very little safe zone in a heel hook between “nothing happening” and “injury happening.” The margin is measured in fractions of a second and millimetres of rotation.
This is why the culture around heel hook training must be different from training other submissions. It is not about being fearful of the technique. It is about applying it with the control and communication that its risk demands.
Non-negotiable safety rules
Before we cover technique, these rules are non-negotiable. They are not guidelines. Every reputable coach and practitioner in modern leg lock BJJ agrees on them.
- Tap early — always. Tap at the first sign of knee pressure. Not when it becomes painful. Not when it feels serious. At the first sign. There is no recovering from a torn ACL to prove a point.
- Never crank in training. Secure the position, control the heel, and hold. Do not twist. If your partner does not tap, release and move on. In training, the goal is control — not the tap.
- Confirm your partner’s experience. Before training heel hooks with anyone, confirm they understand the technique, understand the danger, and know which direction to escape. Never assume this based on belt rank — many traditional academies do not train leg locks at any level.
- Never spin if you do not know the direction. If caught in a heel hook and unsure how to escape, tap immediately. Spinning in the wrong direction accelerates the rotational force and snaps your own knee. This is responsible for the majority of heel hook training injuries.
- No heel hooks in the gi. The friction from gi pants makes rotational force land faster. Most reputable academies ban heel hooks in gi training. Follow your gym’s rules on this without exception.
- Communicate throughout. Both partners should narrate heel hook training. “I have the position.” “I’m applying light pressure.” “Tap.” Eye contact and verbal confirmation replace the natural pain signal that other submissions provide.
History
The heel hook did not originate in BJJ. According to Wikipedia’s entry on the heel hook, the technique comes primarily from Sambo — the Soviet grappling system — and catch wrestling, both of which embraced leg attacks as fundamental submissions from their earliest development.
In traditional BJJ, heel hooks were largely ignored or actively discouraged. The Gracie system was built around positional dominance and upper body submissions. Leg attacks were seen as risky departures from the BJJ philosophy — and for practitioners without proper leg entanglement training, that risk was real.
The shift began with Dean Lister, who famously asked Rickson Gracie: “Why do you ignore 50% of the human body?” That question planted a seed. But the real revolution came through John Danaher and his students — Gordon Ryan, Garry Tonon, Eddie Cummings — who built systematic leg lock games that treated heel hooks not as desperate attacks but as the logical conclusion of positional leg entanglement control.
According to BJJ Heroes, Lachlan Giles’ performance at ADCC 2019 — submitting three heavyweight opponents with outside heel hooks as a 76 kg competitor — is widely considered the moment that forced the entire BJJ world to take leg locks seriously. His victory over Patrick Gaudio, Kaynan Duarte, and Orlando Sanchez in the same night demonstrated that a complete, systematic heel hook game could defeat the most physically dominant grapplers in the world.
How the heel hook works — mechanics
The heel hook works through a lever system applied to the knee joint. Understanding the mechanics helps you apply it safely and escape it correctly.
The heel as a lever handle: Your wrist or forearm hooks behind the opponent’s heel. Their toes sit in your armpit. Your arms create a fixed grip on the heel — a lever handle at the end of the lower leg.
The knee as the fulcrum: Your knee entanglement controls their thigh above the knee joint. By pinching your knees on their thigh, you fix the position of the upper leg and prevent the hip from rotating to absorb force.
Your body rotation as the force: You rotate your entire torso — not just your arms. This body rotation turns the heel while the knee is fixed. The rotational force travels up the lower leg and hits the knee ligaments.
The structures at risk: The ACL (anterior cruciate ligament), MCL (medial collateral ligament), and LCL (lateral collateral ligament) are all under stress depending on the rotation direction. The knee capsule and the menisci also face stress in some positions.
Core mechanical principle: Heel hook = fixed knee above + rotating heel below. Remove either element and the submission fails. Control the knee line first. Hook the heel second. Rotate third.
The knee line — the most important concept in heel hooks
The knee line is the single most important concept in heel hook application and defense. Understanding it separates practitioners who can finish heel hooks from those who cannot — and practitioners who can escape safely from those who get injured.
What is the knee line? It is an imaginary horizontal line across your opponent’s knee. Specifically, it refers to whether your knee entanglement controls their thigh above the knee, locking the joint so it cannot rotate away from the submission pressure.
Why it matters for attacking: Without knee line control — without your knees pinching on their thigh above the knee — your opponent’s hip can rotate freely when you apply the heel hook. That hip rotation absorbs the torque before it reaches the knee ligaments. The submission fails. Every heel hook entry requires establishing knee line control before rotating the heel.
Why it matters for defense: When you are caught in a heel hook, your primary escape goal is to free your knee from their entanglement. Pull your knee free from their hip control — get your knee past their hip line. Once your knee is free, their rotation cannot reach the ligaments. The heel hook fails.
How to establish knee line control: Pinch your knees together on their thigh — above the knee. This prevents their leg from straightening or rotating out of the entanglement. Keep this knee pinch throughout every transition. If the knee pinch opens, they can escape.
Ashi garami positions — the foundation of heel hooks
Ashi garami is the Japanese term for leg entanglement — the family of positions from which heel hooks are applied. You cannot effectively attack heel hooks without understanding ashi garami. Think of it as the guard position for leg attacks.
Standard ashi garami (single leg X)
One of your legs goes across their hip (inside their thigh), the other hooks behind their knee. Your inside foot pushes on their hip to prevent them from turning away. This is the most common entry position for the outside heel hook. It is also called single leg X or SLX.
Outside ashi garami
Your entangling leg goes to the outside of their thigh rather than inside. This changes the rotation available — from here the outside heel hook is more natural. Less common than standard ashi garami but important for leg lock transitions.
Saddle / honey hole (inside sankaku)
Both your legs lace around one of their legs in a triangular entanglement — one leg over their thigh, one leg under their calf, with your feet crossed behind their leg. This is the most controlling leg entanglement position and the primary platform for the inside heel hook. The saddle gives you maximum knee line control, making heel hook finishes and defenses much tighter.
50/50 guard
You and your opponent both have your inside legs laced together — creating a mirror position where both practitioners are in the same entanglement and both are vulnerable to the same attacks. Full breakdown in its own section below.
Inside vs outside heel hook — key differences
| Element | Inside Heel Hook | Outside Heel Hook |
|---|---|---|
| Rotation direction | Heel rotates toward their body (internal) | Heel rotates away from their body (external) |
| Primary position | Saddle / honey hole | Standard ashi garami, 50/50 |
| Power | Higher — stronger torque on knee medial structures | Slightly lower — more susceptible to rolling defenses |
| Danger level | Extremely high | Extremely high (both are dangerous) |
| IBJJF no-gi legality | Brown/black belt only | Brown/black belt only |
| Primary practitioners | Gordon Ryan, Craig Jones, Eddie Cummings | Lachlan Giles (50/50 system) |
Important: Both versions are extremely dangerous. The inside version is generally considered more powerful — but the outside version has ended just as many careers through improper training. Treat both with identical respect and caution.
Inside heel hook — from the saddle position
The inside heel hook is most commonly applied from the saddle (also called the honey hole or inside sankaku). This is a step-by-step overview of the position and finish mechanics. Always drill this slowly with an experienced partner before any live application.
- Establish the saddle position. Your inside leg goes over their thigh. Your outside leg laces under their calf. Your feet cross behind their leg. This creates the saddle entanglement — their leg is trapped inside your legs in a triangular lock.
- Pinch the knee line. Squeeze your knees together on their thigh above the knee. This is your control — without it, they can step over or rotate their hip free.
- Hook the heel. Your inside arm (the arm on the same side as their heel) comes under and around their heel. Your wrist hooks behind the Achilles tendon. Their toes go into your armpit.
- Grip the heel. Cup the heel firmly with your wrist. Do not grab the toes — grip the heel itself.
- Rotate your body. Turn your torso away from their body — rotating so your chest faces away. This is an extremely slow movement in training. The rotation turns the heel toward their body (internal rotation), applying torque to the knee medial ligaments.
- Hold and communicate. In training — hold the position and communicate. Do not twist. Your partner taps and you release immediately. In competition — the same slow rotation creates the finish. Apply steadily, never jerk.
Outside heel hook — from ashi garami
The outside heel hook is applied primarily from standard ashi garami or outside ashi garami. Lachlan Giles built one of the most successful competitive systems around this version, using it to submit elite opponents at ADCC 2019.
- Establish standard ashi garami. Your inside leg goes across their hip. Your outside leg hooks behind their knee. Your inside foot pushes their hip to keep them from turning away.
- Control the knee line. Pinch your knees on their thigh above the knee. Critical — without this, they step over and escape.
- Hook the heel with your outside arm. Your outside arm (the arm on the far side from their body) comes around the outside of their leg and hooks behind the heel. Your wrist sits behind the Achilles tendon. Their toes point toward your armpit.
- Secure the grip. Your inside arm can assist — push against their shin or control the ankle for additional stability.
- Bridge into their knee line. Rather than rotating your body fully, you bridge your hips into their knee line — this is the distinctive finishing mechanic of the outside heel hook. The bridge drives your hip into their thigh while rotating the heel away from their body.
- Hold and communicate. Same training protocol as the inside version. Apply slowly. Communicate. Release immediately on the tap.
The 50/50 position
The 50/50 is a leg entanglement where both practitioners have their inside legs laced together, creating a mirror position where both face the same attack simultaneously. It is called 50/50 because both competitors are theoretically equally vulnerable.
In practice, the 50/50 is a “leg lock shootout” — whoever can hide their heel most effectively while attacking their opponent’s heel wins. Lachlan Giles’ outside heel hook system is partly built around dominating 50/50 exchanges.
Attacking in 50/50: Hide your own heel first — point your toes and turn your heel flat. Once your heel is protected, begin attacking your opponent’s heel with the outside heel hook mechanics. The player who successfully hides their heel while securing the opponent’s heel wins the position.
Escaping 50/50: Attack your opponent’s knee pinch — break their knee control open. Once their knees separate, shift your weight and pull your leg free. You cannot simply pull your heel away — you must first break their knee control.
Gi vs no-gi — legality and application
In the gi: Heel hooks are banned in gi competition at ALL belt levels under IBJJF rules. Most reputable academies also ban heel hooks in gi sparring because the friction from gi pants dramatically accelerates the rotational force — the leg cannot slip or rotate freely, meaning the damage lands much faster than in no-gi. Do not train heel hooks in the gi unless your academy explicitly permits it and your partner fully understands the risks.
In no-gi: This is where heel hooks live. No-gi training is the correct environment. The absence of gi friction allows the leg some natural slip, which provides slightly more warning time before damage. However, even in no-gi, the margin is extremely small — tap early, always.
Legality by ruleset — full table
| Ruleset | Inside Heel Hook | Outside Heel Hook | Notes |
|---|---|---|---|
| IBJJF Gi | Illegal — all belts | Illegal — all belts | Immediate disqualification |
| IBJJF No-Gi | Brown & Black only | Brown & Black only | Illegal for white, blue, purple |
| ADCC | Legal — all levels | Legal — all levels | Reaping rules still apply |
| EBI / Submission Underground | Legal | Legal | No reaping restriction |
| NAGA | Intermediate/Advanced | Intermediate/Advanced | Beginner divisions — illegal |
| Most local no-gi open | Varies by event | Varies by event | Always check event rules before competing |
Always check the IBJJF complete guide for current rules before competing. Ruleset changes happen and the table above reflects rules as of May 2026.
Safe training framework — progressive phases
The BJJ Graph analysis recommends a progressive training framework for heel hooks — moving through distinct phases before applying any finishing mechanics. This is the approach used by reputable leg lock coaches including Lachlan Giles and the Danaher Death Squad system.
Phase 1 — Education only (first 1–2 weeks)
No physical drilling of finishing mechanics. Study the anatomy at risk. Understand what an ACL tear is and why it can happen before pain occurs. Watch instructional footage. Read. Develop genuine respect for the technique before touching it. This is not optional — it is foundational.
Phase 2 — Positional control only (4–8 weeks)
Drill leg entanglement entries. Practice the ashi garami positions. Work on maintaining the saddle and ashi garami while your partner attempts realistic escapes. Do not practice the heel hook finish at all. Build muscle memory for controlling the positions safely before adding any rotational mechanics.
Phase 3 — Slow finish drilling (ongoing)
With an experienced, consenting partner — begin drilling the heel hook finish mechanics at 10–20% speed and force. The goal is to feel the position, not to apply pressure. Your partner taps at the first sign of rotation — not when it feels dangerous. This phase continues throughout your heel hook development. You never “graduate” to applying heel hooks at force in training.
Phase 4 — Live drilling with calibration
With experienced partners who have completed the previous phases — begin positional sparring from leg entanglement positions. Both partners apply heel hooks slowly. Communication is constant. This is not regular sparring — it is structured positional work with explicit safety protocols in place.
Defense and escapes
Hide the heel — prevention first
The best heel hook defense is never giving up the heel. Point your toes and turn your heel flat against the mat. If they cannot hook the heel, they cannot apply the submission. Craig Jones describes hiding the heel as the first line of defense — build this habit from your first day of leg lock training.
Clear the knee line
If caught in a leg entanglement, your primary goal is to free your knee from their entanglement. Pull your knee toward your own chest and away from their hip. Once your knee is clear of their hip control, their rotational force has no fixed point to lever against and the heel hook fails.
Hand fight the heel grip
As they attempt to hook the heel, use two hands to fight their grip — two hands versus one arm. Peel their hand off your heel before they can establish the hook. This must happen early — once the heel hook is fully locked, hand fighting is ineffective.
Tap early — always
If you are caught in a heel hook and cannot escape cleanly — tap. Tap at the first sensation of knee pressure. Not when it hurts. At the first sensation. This is the most important defensive tool in your heel hook game. There is no submission in BJJ worth a torn ligament.
Do not spin the wrong direction
If you feel a heel hook and instinctively spin — you must spin toward your heel, not away from it. Spinning away from the heel amplifies the rotational force and accelerates the injury. If you do not know which direction to spin, tap immediately and ask your partner to teach you the correct escape for that specific position.
Common mistakes
- No knee line control before hooking the heel. The most common technical mistake. If you hook the heel before establishing knee line control, your opponent’s hip rotates to absorb the force and they escape. Knee line first — always.
- Cranking in training. Applying force quickly instead of slowly in training. This is how training partners get injured. Slow application only. The goal in training is to demonstrate control, not to force a tap.
- Spinning the wrong direction when caught. Instinctive spinning away from the heel dramatically increases injury risk. Learn the correct escape direction for each position before training heel hooks live.
- Training with unprepared partners. Assuming a training partner understands heel hook danger based on belt rank. Always confirm experience level explicitly before training leg locks.
- Gripping the toes instead of the heel. A toe grip gives much less control over the lever. Hook the heel — specifically behind the Achilles tendon — not the toes or midfoot.
- Skipping positional phases. Moving to finishing mechanics before mastering the ashi garami positions. Without solid positional control, heel hooks are dangerous to both parties — you cannot control the finish if you cannot hold the position.
Belt-level training guide
The approach to heel hooks must be calibrated carefully by experience level. The BJJ belt system provides a framework, but heel hook training specifically requires additional caution beyond what belt rank alone implies.
White belt — defense and awareness only
Learn to hide the heel. Learn to clear the knee line. Learn to tap immediately when caught in any leg entanglement. Do not practice finishing mechanics. Read the white belt guide — the foundational positional habits built at white belt directly transfer to safer leg lock training later. Build the tap reflex first. Everything else comes after.
Blue and purple belt — positional control and straight ankle locks
Learn ashi garami and saddle positions as control exercises. Study the straight ankle lock — it is legal at these levels and builds the positional awareness that makes heel hook training safer later. Begin slow, supervised heel hook finish drilling only with experienced partners who have explicit academy approval. The positions, not the finishing mechanics, are the priority.
Brown and black belt — full system development
Develop a complete leg entanglement system — inside heel hook from the saddle, outside heel hook from ashi garami and 50/50, transitions between positions, and combination chains with the kneebar and straight ankle lock. At this level, for advanced study, Craig Jones’ Battle Tested Leglocks and Lachlan Giles’ outside heel hook instructionals are among the most respected resources available.
In competition
In competition, heel hooks are among the most reliable finishes in modern no-gi BJJ and submission grappling when applied from a complete positional system.
Lachlan Giles’ ADCC 2019 performance — submitting three opponents with outside heel hooks as a lightweight competitor — remains the most celebrated heel hook performance in competition history. His use of the outside heel hook from 50/50 guard demonstrated that a systematic, position-first approach to leg locks could dominate even the largest and most physically powerful opponents.
Gordon Ryan, Craig Jones, and the Danaher Death Squad competitors have collectively redefined no-gi competition through inside heel hook systems built around the saddle position. Their performances at ADCC, WNO, and CJI events established leg lock dominance as a legitimate and complete competitive system rather than a shortcut submission.
Ryan Hall famously submitted BJ Penn with a heel hook in the UFC using an Imanari roll entry — demonstrating the technique’s viability in MMA as well as pure submission grappling.
Before competing, always confirm the ruleset for heel hooks at your specific event. Rules vary significantly between organisations and even between divisions within the same organisation. Check the IBJJF complete guide for IBJJF-specific rules. In competition, apply heel hooks with controlled, steady pressure — do not crank. Cranking at speed risks injuring your opponent before they can tap.
Frequently asked questions
Are heel hooks legal in BJJ competition?
It depends on the ruleset. IBJJF gi: illegal at all belt levels. IBJJF no-gi: legal for adult brown and black belts only. ADCC: legal at all levels. EBI and most modern no-gi promotions: legal. Always check the specific rules for your event before competing.
What is the difference between an inside and outside heel hook?
The inside heel hook rotates the opponent’s heel toward their body — internal rotation — creating greater torque on the knee’s medial ligaments. It is typically applied from the saddle position. The outside heel hook rotates the heel away from the body — external rotation — and is usually applied from standard ashi garami or 50/50. The inside version is generally considered more powerful and dangerous.
Why are heel hooks more dangerous than other submissions?
Unlike chokes or armbars where pain clearly precedes serious injury, heel hooks can damage knee ligaments before significant pain occurs. The ACL has limited nerve sensitivity — rotational force can tear it before the pain signal reaches the brain. By the time it hurts, the damage may already be done. This is why tapping early is not optional — it is essential.
What is ashi garami?
Ashi garami is the Japanese term for leg entanglement — the family of positions from which heel hooks and other leg locks are applied. Understanding the ashi garami positions (standard, outside, saddle, 50/50) is the foundation of any heel hook system. Attempting heel hooks without positional ashi garami knowledge is how training injuries happen.
What is the knee line and why does it matter?
The knee line is the imaginary horizontal line across your opponent’s knee. Controlling it — by pinching your knees on their thigh above the knee — is what allows rotational force to reach the knee ligaments. Without knee line control, their hip absorbs the rotation and the heel hook fails. It is the most important concept in both attacking and defending heel hooks.
How do I escape a heel hook?
Prevention first — hide your heel by pointing your toes flat against the mat. If the heel hook is being applied, your primary goal is to free your knee from their entanglement by pulling it toward your chest. If you feel knee pressure and cannot escape cleanly, tap immediately. Do not spin unless you know the correct direction — spinning the wrong way amplifies the force and snaps your own knee.
Should white belts learn heel hooks?
White belts should learn the defensive concepts first — how to hide the heel, how to clear the knee line, and most importantly, how to tap early. Learning to apply heel hooks should wait until positional ashi garami control is solid, an experienced partner is available, and explicit academy approval is given. Most reputable academies introduce heel hook application at blue belt or above, with defensive awareness from day one.
Quick reference
| Element | What to do |
|---|---|
| Knee line | Control first — always. Pinch knees on thigh above knee before hooking. |
| Heel hook grip | Hook behind Achilles tendon with wrist. Toes in armpit. |
| Inside vs outside | Inside = toward body (saddle). Outside = away from body (ashi garami). |
| Finish mechanic | Rotate entire body — never just arms. Slow and controlled always. |
| Training rule #1 | Never crank. Secure position, hold, communicate. Release on tap. |
| Defense rule #1 | Tap early — at first sign of knee pressure. No exceptions. |
| Hide the heel | Point toes, turn heel flat against mat. Prevention beats escaping. |
| Wrong direction spin | Never spin away from the heel if unsure. Tap instead. |
| IBJJF no-gi legality | Brown/black belt only. Illegal at all other levels. |
| ADCC legality | Legal at all levels. |
The heel hook is not going away. Modern no-gi BJJ has made it essential — not optional. If you compete in no-gi, you will face leg lock systems. If you do not understand heel hooks, you are at a systematic disadvantage.
But the path to heel hooks runs through positions, not finishes. Learn the ashi garami positions first. Build the knee line control. Master the straight ankle lock. Develop the tap reflex. Then — with the right partner, the right environment, and the right protocols — begin the finishing mechanics slowly.
The practitioners who get injured are almost always those who skipped the positional foundation and tried to apply finishing mechanics before they had the control to do so safely. Build the foundation. The heel hook will still be there — and you will be able to use it without hurting yourself or anyone else.
Mohsin has trained Brazilian jiu-jitsu for 6 years at Gracie Bara.
He has competed at IBJJF-affiliated tournaments and writes about BJJ
competition, gear, and athlete careers. He founded BJJ Sportswear
to help grapplers find quality equipment and information.