BJJ Armbar Guide: Setup, Finish & Positions
The armbar is BJJ’s most versatile submission.
Unlike the triangle or rear naked choke, you can attack it from almost every position on the mat — closed guard, mount, side control, back control, and scrambles. It shows up after sweeps, failed passes, and guard recoveries. In IBJJF competition, it consistently ranks among the top three most finished submissions alongside the triangle and rear naked choke. In the UFC, it is the third most common submission finish overall.
A coach once put it well: “If you only learn five submissions in BJJ, make sure one of them is the armbar.” This guide is why.
We cover everything — the mechanics, the thumb rule, step-by-step finishes from four positions, how to beat the stack and the hitchhiker escape, combo chains, and how to train it at every belt level.

Table of Contents
What is the BJJ armbar?
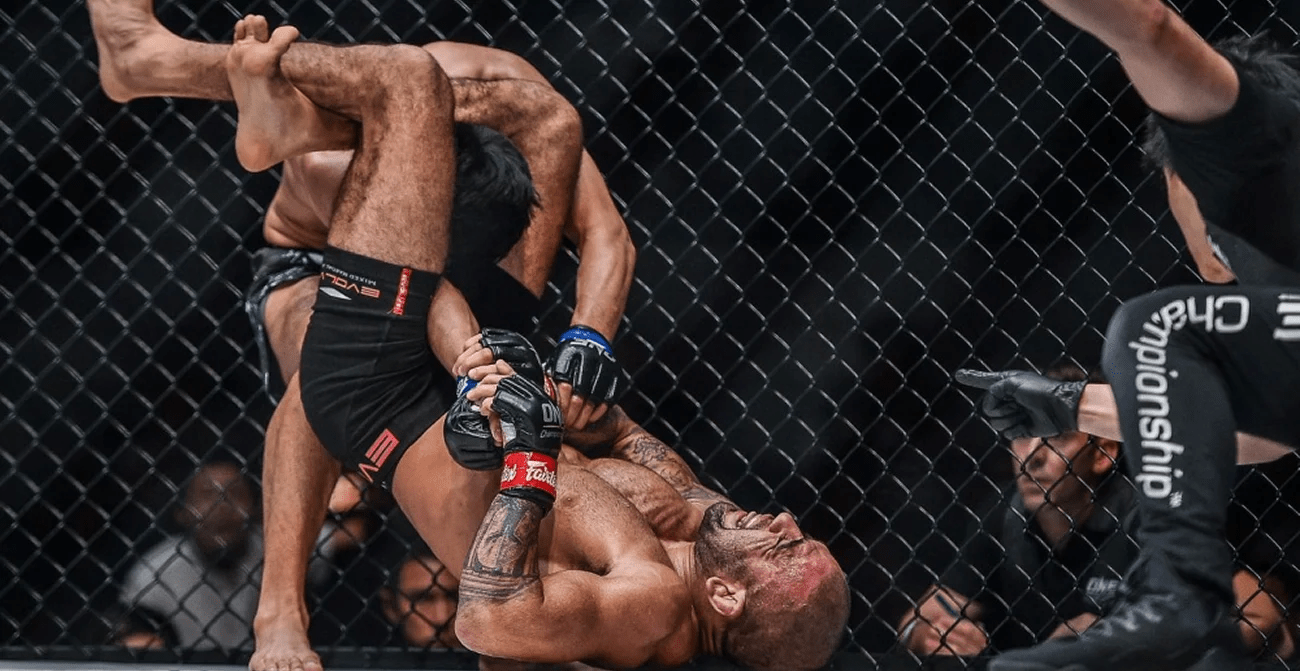
An armbar is a joint lock submission that attacks the elbow. You isolate your opponent’s arm between your legs, control their wrist, and extend their elbow past its natural range of motion by lifting your hips upward.
The elbow is a hinge joint designed to bend in one direction only. The armbar forces it the wrong way. When applied with correct mechanics, the pressure is immediate and inescapable. The opponent taps — or risks a hyperextended elbow.
In Japanese, it is called juji-gatame, meaning “cross lock.” This name comes directly from judo, where the technique originates. You will hear both names in any BJJ gym — armbar and juji-gatame refer to the same submission.
Competition fact: The armbar is the 3rd most common submission finish in the UFC behind the rear naked choke and guillotine. In IBJJF gi competition, it consistently ranks in the top three submissions by finish rate across all belt levels and weight classes.
History — juji-gatame and BJJ
The armbar originated in Japanese judo as juji-gatame, one of the core armlocks in the Kodokan’s kansetsu-waza (joint lock techniques) list. According to Wikipedia’s entry on juji-gatame, the technique was part of judo’s foundational curriculum from the early 1900s. Judo competitions used it heavily before it crossed into BJJ through the Gracie family’s judo lineage.
In Brazilian Jiu-Jitsu, the armbar became a cornerstone submission from the very beginning. The Gracie challenge match system relied on it heavily — it was one of the first techniques Hélio Gracie refined for smaller practitioners against larger opponents. The leverage-based mechanics made it ideal for the Gracie philosophy: technique beats strength.
According to BJJ Heroes, the armbar’s integration into guard work — particularly the closed guard — was a key development of early Brazilian BJJ. Pairing it with the triangle choke created the double-threat system that still forms the foundation of closed guard attacks today.
Royce Gracie used the armbar in multiple early UFC bouts. Today, champions like Gordon Ryan, Leandro Lo, and Mica Galvão continue to finish opponents with armbar attacks at the highest levels of competition.

How the armbar actually works
The armbar uses a lever system. Your hips are the fulcrum. The opponent’s elbow is the lever point. Understanding this stops you from squeezing with your arms — which almost never works — and teaches you to drive with your hips, which almost always does.
Four body parts must work together for the armbar to finish:
- Hips. They generate all the upward force. Raise your hips and the elbow bends the wrong way. Flat hips mean no pressure.
- Legs. One leg presses over the head to stop the opponent sitting up. The other pins the far arm or controls the body. Both legs pinch together to trap the arm and prevent rotation.
- Wrist control. You hold their wrist against your chest throughout the finish. If the wrist floats free, the opponent can rotate the shoulder and relieve pressure on the elbow.
- Shoulder line control. The opponent’s elbow must sit above their shoulder on your hip. If the elbow drops below the shoulder line, the joint can rotate and survive the pressure.
Core principle: Hips up, knees pinched, wrist controlled, elbow above the shoulder line. All four together. Miss any one and the armbar does not finish.
The thumb rule — most important detail
Before you apply any armbar, check the thumb direction. The opponent’s thumb must point upward — toward the ceiling.
The elbow is a hinge joint. It only bends in one direction. When the thumb points up, the elbow joint is oriented correctly for the armbar — it will hyperextend when you lift your hips. When the thumb points down or sideways, the opponent can rotate their shoulder and reduce the pressure enough to survive.
This is the single most common reason armbars feel “on” but do not finish. The arm is isolated, the hips are lifting — but the thumb is pointing the wrong way and the opponent’s shoulder is rotating.
Fix it immediately: If the thumb is pointing down, rotate their wrist so the thumb comes up before you apply hip pressure. In gi BJJ you can use the sleeve grip to control the rotation. In no-gi, control the wrist firmly and twist it outward.
Armbar from closed guard — step by step
This is where almost every BJJ student learns the armbar first. The closed guard gives you posture control throughout the setup, which makes it the safest position to learn the mechanics.
- Break posture. Pull your opponent’s head down with both hands or a collar grip. Their back must curve forward. An upright opponent is very hard to armbar from guard.
- Isolate the arm. Grip their wrist with one hand and post on their tricep with the other. Pull the arm across your body so their elbow sits directly over your hip.
- Check the thumb. Confirm the thumb points upward. If not, rotate the wrist until it does.
- Open guard and angle off. Open your guard. Do not fall straight back — angle your body off to the side of the trapped arm. This stops them from stacking you.
- Swing the leg over. Bring your knee to your chest and swing your leg across their head. Keep the leg tight against their neck — not loose above their head.
- Pinch knees together. Squeeze both knees together to trap the arm. This is what prevents them rotating out.
- Finish. Hold their wrist against your chest, press your heels into their back, and lift your hips upward. The elbow hyperextends and the tap comes. Apply steadily — not in a jerk.
Armbar from mount and S-mount
The mount armbar is one of the highest-percentage armbars in competition because you already control the position before attacking. From mount, your opponent’s first instinct is to push on your hips or chest — which exposes their arm for the attack.
Standard mount armbar
- Isolate the target arm. When your opponent pushes on your chest or hips, overhook that arm with your same-side arm and pull it into your body.
- Maintain chest pressure. Keep your weight heavy on their chest while you set up. Do not rise up — this gives them a bridge and roll escape.
- Walk your knee up. Slide your knee up toward their head on the side of the trapped arm. You want your knee near their ear — not at their hip.
- Get perpendicular. Your body needs to be facing their side — not facing their head. This angle is essential for the finish.
- Slide the leg across. Swing your leg across their face. Do not step over — slide across with your shin painting their face. Stepping over creates space for the escape.
- Fall back and finish. Fall back toward the mat, pulling their wrist to your chest. Pinch your knees, lift your hips. The tap comes.
S-mount armbar (advanced)
The S-mount is a high mount variation where you bring one knee up to their ear level and hook your foot behind their shoulder. From S-mount the armbar is extremely tight — there is almost no space for the opponent to create frames or bridge.
To get S-mount: from standard high mount, walk your knee up to ear level on the trapped arm side. Hook your foot under their far shoulder. Your body forms an S-shape. From here, swinging the leg across for the armbar takes almost no space and gives the opponent very little time to react.
Armbar from side control
The armbar from side control is a strong option when your opponent pushes their near arm into your hip or chest to create frames.
- Identify the near arm. When your opponent extends their near arm to push, trap it immediately by clamping your near arm over their elbow.
- Step over the head. Bring your far leg over their head. Your knee comes down on the far side of their head to control it and prevent them sitting up.
- Secure the wrist. Grab their wrist with both hands and pull it to your chest. Check the thumb — it must point up.
- Drop your hips. Lower your hips to the mat. The armbar from side control finishes with your hips dropping rather than rising. The leverage works in reverse — your body weight drives the elbow down as their arm is pulled up.
- Finish. Pull the wrist to your chest and drive your hips down. Pinch your knees to stop the arm rotating out.
Armbar from back control
The armbar from back control is a strong secondary attack when the opponent defends the rear naked choke aggressively with both hands on your choking arm.
- Identify the defending arm. When your opponent grips your choking arm with both hands and pulls it down, their defending arm extends across their body in the perfect position for an armbar.
- Release the choke. Let the choking arm go. Use it instead to control the opponent’s defending arm — you now have their wrist and their arm is already isolated.
- Rotate to the side. Move both feet to one side and rotate your body 90 degrees. Your hips swing toward the trapped arm.
- Lock the arm and finish. Your thigh pins their elbow. Pull the wrist to your chest and extend your hips. The angle of the armbar from back control is slightly different from the guard version — apply the pressure gradually and feel for the tap.
Gi vs no-gi differences
In the gi: Sleeve grips give you automatic control over the wrist and thumb direction. A firm sleeve grip means the opponent cannot rotate their arm to escape the pressure. You can also use collar grips to break posture far more efficiently before attacking. The gi slows transitions — you have more time to set up the angle correctly.
In no-gi: No sleeve grips means wrist control is entirely positional. Your hands must actively clamp the wrist against your chest throughout the finish. The opponent can rotate their arm more easily in no-gi, so the pinch with your knees becomes even more critical. Transitions are faster — attacks must be sharper and more committed.
Key no-gi adjustment: In no-gi, attack the armbar immediately when the opportunity appears. Do not pause to adjust. The moment you hesitate, the opponent postures up and the window closes. In the gi you have a fraction more time to set details before committing.
Combo chains
The armbar reaches its maximum effectiveness when paired with the triangle choke and the omoplata. All three attacks target the same arm from the same position. Your opponent must make a choice — and every choice they make opens one of the other submissions.
Triangle → Armbar → Omoplata (the core chain)
Attack the triangle choke. Your opponent postures up or clasps their hands to defend — their arm extends. Switch immediately to the armbar by releasing your legs and pivoting. If they stack or turn to escape the armbar, sweep the arm away and convert to the omoplata. Three submissions sharing the same setup. Your opponent cannot defend all three.
Armbar → Triangle
You attack the armbar from guard. Your opponent pulls their arm free or drives forward to stack you. As they drive forward, their posture breaks and their neck comes into range. Catch the triangle choke. The armbar forced the reaction — the triangle is the finish.
Armbar → Kimura
From mount, you attack the armbar. Your opponent rolls toward you to escape. As they roll, the kimura grip is right there — their arm is already bent and behind their back. Lock the kimura figure-four and finish from top position.
Armbar → Back take
You attack the armbar from guard. Your opponent pulls their arm free and turns away. Follow their movement by rotating your body behind them. Take the seatbelt grip and insert your hooks. You are now in back control — attack the rear naked choke.
Beating the stack defense
The stack is the most common armbar defense. Your opponent drives their weight forward and downward, flattening your hips to the mat and reducing hip pressure on the elbow. Here is how to beat it.
Angle off before the stack
The stack only works when you fall straight back. When you angle off to the side of the trapped arm — 30 to 45 degrees — the stack loses most of its power. Your opponent cannot drive their weight through the angle. Prevention beats the cure here.
Pivot when stacked
If you are already being stacked, pivot your body away from the trapped arm. Rotate 90 degrees in the direction the stack is pushing you. This puts you perpendicular to them — the stack pressure disappears and your hip leverage returns.
Switch to triangle
When stacked, throw your legs back up and catch the triangle choke. Your opponent’s head is already forward and their arm is already isolated. The triangle flows naturally from a stacked armbar attempt. This is the most reliable counter to stacking at advanced belt levels.
Squeeze knees hard
Some stacks can be survived simply by pinching the knees tightly enough to stop the arm rotating out. Keep the wrist controlled, keep the knees pinched, and continue driving your hips even as they stack. Against a light stack this sometimes finishes regardless.
Beating the hitchhiker escape
The hitchhiker escape is an advanced defense where your opponent rotates their body in the same direction as the armbar pressure — like a hitchhiker rotating their thumb — to relieve elbow pressure and roll out of the submission.
To prevent it:
- Control the wrist tightly. The hitchhiker relies on wrist rotation. If the wrist is glued to your chest and cannot rotate, the escape becomes much harder.
- Keep your legs tight. Loose legs give the opponent space to roll. Pinch your knees and drive your heels into their back.
- Finish fast. The hitchhiker is an escape — which means there is a moment before it completes. Apply hip pressure quickly once the armbar is locked. Do not sit in the position.
- Switch to omoplata. If the hitchhiker is already happening and they are rolling toward you, sweep their rolling arm away with your leg and lock the omoplata. The hitchhiker roll creates the omoplata entry automatically.
Defense and escapes
Prevention — do not let the arm get isolated
The best armbar defense is never letting one arm get extended and isolated on one side of your body. Keep elbows in when inside someone’s guard. Never straighten one arm toward the opponent’s hip. If both elbows stay between your knees and their body, the classic guard armbar entry is blocked.
Stack immediately
The moment you feel the leg swing across your head, drive your weight forward and down. Stack their hips toward their face. This flattens their hip pressure and gives you time to extract the arm or escape. Go immediately — once the hip pressure is fully applied, stacking becomes very hard.
Thumb down to rotate
Rotate your thumb downward as fast as possible. If you can turn the thumb toward the mat before the knees clamp down, the shoulder rotation relieves much of the elbow pressure. This buys time for the stack or arm extraction.
Clasp hands
Grip your own hands together to prevent the arm from being extended. This is a temporary defense — a strong hip drive will eventually break it. Use the time it buys to stack, stand, or turn into your opponent.
Hitchhiker roll
Roll your body in the same direction as the armbar pressure, like a hitchhiker’s thumb. This rotates the shoulder and relieves elbow pressure, allowing you to roll through to a top position. It requires timing — attempt it early before the knees are fully pinched and the wrist is locked to the chest.
Common mistakes
- Falling straight back. This is an invitation to be stacked. Always angle off to the side of the trapped arm — never fall directly backward.
- Thumb pointing the wrong way. The most overlooked detail at every belt level. Check the thumb before applying any hip pressure. No thumb check, no finish.
- Hips too flat. Without hip height, there is no lever pressure on the elbow. Drive your hips up toward the ceiling throughout the finish. Low hips mean a loose armbar.
- Loose knees. Knees apart means the opponent can rotate out. Squeeze the knees together from the moment the leg swings over. Stay squeezed until the tap.
- Wrist control lost. Letting the wrist float away from your chest removes the fixed point that makes the lever work. Hold the wrist tightly against your sternum throughout.
- Telegraphing the attack. Grabbing the wrist and staring at it before moving gives your opponent two seconds to posture up. Set the grip and move — do not pause between isolation and the leg swing.
- Jerking instead of squeezing. Cranking the elbow with a sudden jerk injures training partners and often causes the arm to be pulled free. Apply steady, increasing pressure. Control, then finish.
Belt-level training guide
The BJJ belt system gives you clear milestones for where your armbar should be at each stage of your journey.
White belt — closed guard armbar only
Learn the closed guard armbar exclusively. Focus on the thumb rule, the angle off, and the hip drive. Do not try other positions yet. Drill the setup 15 to 20 times per session before rolling. The white belt guide covers the foundations you need alongside this technique.
Blue and purple belt — multiple positions and chains
Add the mount armbar and S-mount entry. Start practising the triangle-armbar-omoplata chain in drilling until each transition is automatic. Develop your stack counter — the pivot and the triangle switch. The armbar should be finishing in live rolling regularly against resisting training partners.
Brown and black belt — full system
Add side control and back control armbars. Develop hitchhiker escape prevention. Build your personal armbar system — which setups work for your body type, which combos you chain most naturally. At this level, for deep study, John Danaher’s Enter the System series covers armbar mechanics in the most complete detail available.
BJJ armbar in competition
The armbar is the third most common submission finish in the UFC and consistently ranks among the top three in IBJJF gi competition. It works at every belt level and across all weight classes.
Famous armbar finishes include Ronda Rousey — who built her entire career on one of the most consistent armbar games in MMA history, finishing multiple opponents including Miesha Tate twice. Frank Mir submitted Brock Lesnar with an armbar in their first fight. Leandro Lo has finished multiple world-class opponents with guard armbars at the highest levels of IBJJF competition.
Always check the IBJJF competition guide for your division. The straight armbar is legal at all adult belt levels in both gi and no-gi competition. It is not permitted in youth divisions. Flying armbar entries may be restricted in some rulesets — verify before competing.
Frequently asked questions
What is a BJJ armbar?
A BJJ armbar is a joint lock submission that hyperextends the opponent’s elbow by forcing it past its natural range of motion. It uses your hips as the primary engine — not arm strength. It is one of the three core submissions in BJJ alongside the triangle choke and rear naked choke.
What is juji-gatame?
Juji-gatame is the Japanese name for the armbar, meaning “cross lock.” It originated in judo and refers to the same technique used in BJJ — a straight armlock applied by trapping the opponent’s arm between your legs and extending the elbow with your hips.
Is the armbar legal in all BJJ divisions?
The straight armbar is legal for adult competitors at all IBJJF belt levels in both gi and no-gi competition. It is not permitted in youth divisions. Always check the current IBJJF rules for your specific age and belt division before competing.
Why does my armbar keep getting stacked and escaped?
Stacking happens when your hips are too flat and your angle is wrong. Fix it by angling off to the side of the trapped arm instead of falling straight back. Keep your hips high and your heels driving into the opponent’s back. If they stack, pivot 90 degrees and switch to the triangle choke.
Which way does the thumb point in an armbar?
The thumb should point upward — toward the ceiling. This orients the elbow so it hinges the wrong way when you lift your hips. If the thumb points down or sideways, the opponent can rotate their shoulder and reduce elbow pressure, making the armbar much harder to finish.
What is the best position to learn the armbar first?
Learn the armbar from closed guard first. It is the safest position to practice the mechanics because you have posture control throughout. Once the guard armbar is reliable, add the mount version and then side control entries.
Can a smaller person finish an armbar on a bigger opponent?
Yes. The armbar uses the hips — the strongest muscles in your body — against the elbow joint, one of the body’s most vulnerable points. Leverage makes size irrelevant when mechanics are correct. A properly applied armbar requires very little muscular strength to finish.
Quick reference
| Element | What to do |
|---|---|
| Thumb direction | Must point upward before applying hip pressure |
| Angle | Always angle off to the side — never fall straight back |
| Hips | Drive upward — they do all the work |
| Knees | Pinched together throughout — stop the rotation |
| Wrist control | Glued to your chest from setup to finish |
| Elbow position | Above the shoulder line, over your hip |
| Stack counter | Angle off / pivot away / switch to triangle |
| Hitchhiker counter | Tight wrist + fast finish / switch to omoplata |
| Primary combos | → Triangle → Omoplata → Kimura → Back take |
The armbar rewards patience and precision more than any other submission in BJJ. The mechanics are not complicated. Executing them cleanly against a resisting, experienced opponent — that is what the drilling is for.
Start with the closed guard armbar. Get the thumb rule and the angle automatic. Add the mount and S-mount. Build the chains one at a time. In a year of consistent practice, you will find the armbar attacking naturally from every position on the mat — because the mechanics stay the same wherever you find it.
Mohsin has trained Brazilian jiu-jitsu for 6 years at Gracie Bara.
He has competed at IBJJF-affiliated tournaments and writes about BJJ
competition, gear, and athlete careers. He founded BJJ Sportswear
to help grapplers find quality equipment and information.