By the BJJ Sportswear Editorial Team | Last reviewed: May 2026 | Written and reviewed by active BJJ practitioners with 10+ years of mat experience.
The triangle choke is one of the most dangerous submissions in BJJ.
It needs no strength. It needs no size advantage. You use your legs — the strongest muscles in your body — to cut off blood supply to your opponent’s brain. When it’s locked in correctly, the tap comes within seconds.
Royce Gracie used it to submit Dan Severn at UFC 4, a man who outweighed him by 90 pounds. World champions use it today at ADCC and IBJJF Worlds. A blue belt at a local competition can use it just as effectively.
This guide walks you through the whole triangle system — what it is, how it works mechanically, how to set it up, how to finish it, how to chain it with other attacks, and how to defend it when someone throws it at you.

Table of Contents
What Is the Triangle Choke?
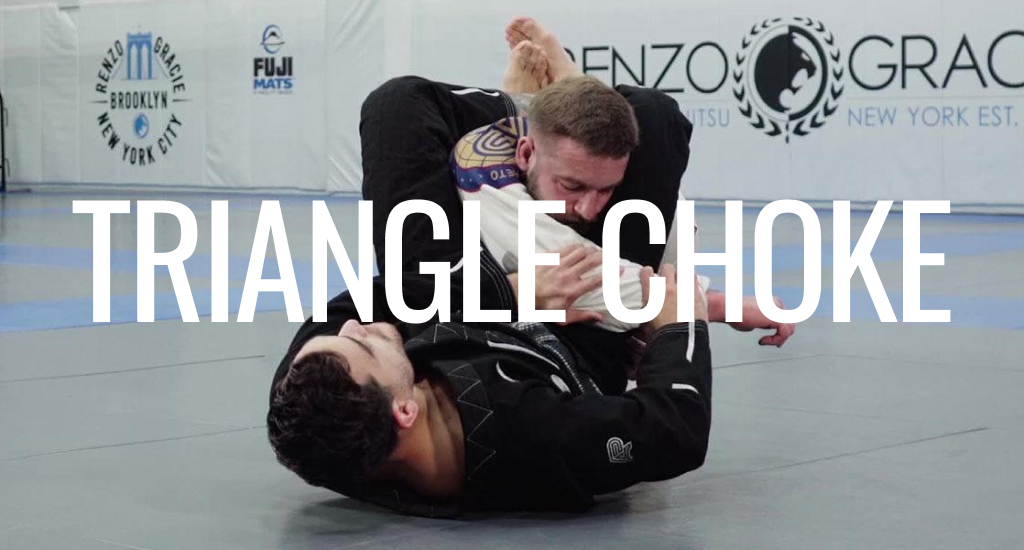
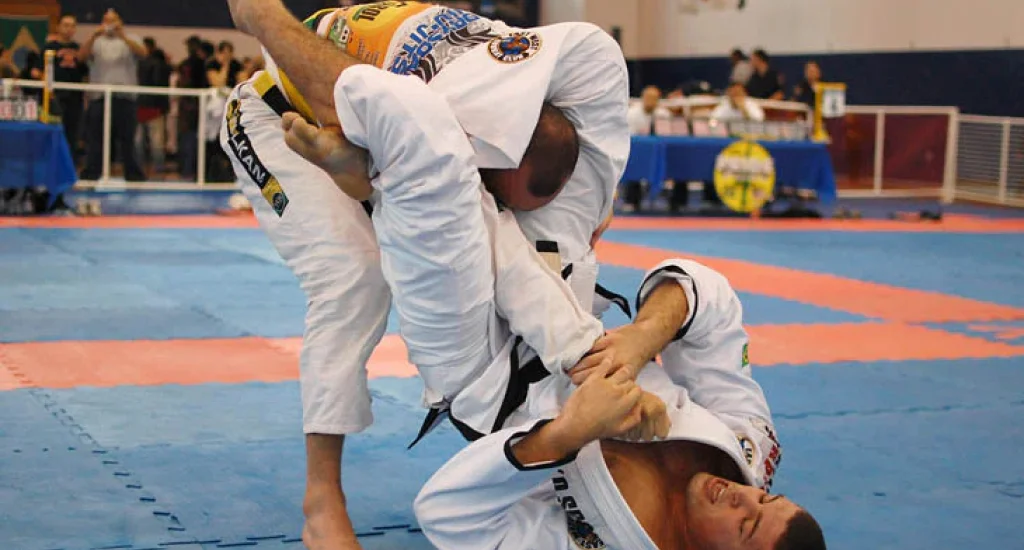
The triangle choke is a submission where you wrap your legs around your opponent’s neck and one of their arms. One leg crosses behind the knee of your other leg, forming a figure-four shape — like a triangle.
The result: pressure lands on both sides of the neck at the same time.
It is a blood choke, not an air choke. You are not blocking the windpipe. You are compressing the carotid arteries, which carry blood to the brain. When both carotids are compressed, the opponent taps — or goes unconscious. Most tap quickly because the pressure builds fast and there is no hiding it.
In Japanese, the technique is called sankaku-jime — meaning “triangular choking.” In Portuguese it is triângulo.
The technique scales beautifully. A 60 kg woman can triangle choke a 100 kg man with correct mechanics. That is the whole point of BJJ — technique overrides strength and size.

A short history of the triangle choke
The triangle choke started in Kosen Judo in Japan in the early 1900s. According to triangle choke on Wikipedia, the first recorded tournament use came at a Kosen Judo competition in Kobe, Japan in November 1921. It is linked to Yaichibei Kanemitsu and his student Masaru Hayakawa. Judo master Masahiko Kimura later helped develop and refine the side triangle variation.
The technique crossed into Brazilian Jiu-Jitsu through the Gracie family’s judo lineage. According to BJJ Heroes, it was Rolls Gracie — widely respected as the most technically complete of the early Gracies — who brought the triangle into the BJJ system in the late 1970s.
The key breakthrough came at Osvaldo Alves’ gym in Rio de Janeiro. Grapplers there discovered that pairing the triangle with the armbar made both attacks dramatically more dangerous. Defend the armbar and the triangle opens. Defend the triangle and the armbar opens. That pairing is still central to modern BJJ today.
How the triangle choke actually works
Before you drill it, understand three core mechanics. These explain why the technique is so effective — and why most beginners get it wrong.
Mechanic 1: Blood choke pressure. Your hamstring presses against one side of the opponent’s neck. Their own trapped shoulder presses the other side. Both carotid arteries compress at the same time. Studies show a properly locked triangle choke causes unconsciousness in an average of 9.5 seconds. Most opponents tap well before that.
Mechanic 2: The 90-degree angle. You cannot finish the triangle lying flat beneath your opponent. You must rotate your body about 90 degrees to the side — perpendicular to them. This single adjustment turns a loose position into a tight choke. Miss the angle and your opponent can sit in your triangle comfortably. This is the most common mistake at white and blue belt.
Mechanic 3: The hidden shoulder. One arm must be inside your legs. The other stays outside. The inside arm’s shoulder must be pulled all the way across your centerline. This shoulder does half the choking work for you. If the shoulder is sticking out and you can see the elbow, the choke has a gap and will not finish.
Key principle: Angle first. Hide the shoulder. Then squeeze. Always in that order.

Step-by-step: triangle choke from closed guard
This is the foundational entry. Everything else builds from here. The closed guard is where most BJJ practitioners first encounter and learn this submission.
- Break posture. From closed guard, pull your opponent’s head down with both hands or a collar grip. Their back must curve forward. A square, upright opponent is very hard to triangle.
- Control the wrists. Grab one wrist and push it toward the mat. This opens one side, isolates that arm, and stops your opponent from defending.
- Get one arm in, one arm out. One arm goes inside your guard. The other stays outside. Push the inside arm across their body toward their opposite hip.
- Explode your hips up. Open your guard and drive your hips sharply upward. This move must be quick and decisive. One leg goes over the shoulder of the trapped arm. Your other leg slides under the opposite shoulder.
- Cross your feet. Cross your feet and immediately control the opponent’s head with both hands. You are not finishing yet — you are threatening.
- Lock the figure-four. Place the back of one knee over the shin of the other leg. Lock high on the neck — behind the ear, not across the jaw.
- Cut the angle (most important step). Push off your opponent’s hip with your free foot. Rotate your body about 90 degrees to the side. You must be perpendicular to them. Do this before you squeeze.
- Hide the shoulder. Pull the trapped arm all the way across your centerline. If you can still see their elbow pointing outward, drag the arm further across your body.
- Finish. Press your shin down into the side of the neck. Curl your locking leg downward at the same time. Pull the head toward your hip with both hands. Squeeze with your hips rising — not just your legs closing. The tap comes.
Triangle choke variations
Front triangle (standard)
The version from the step-by-step above. Your legs face the front of the opponent’s body. This is the most common version in competition and the one to master before all others.
Reverse triangle
Your legs lock in the opposite direction — facing away from your opponent’s torso. This comes up naturally from scrambles, the turtle position, and back-take attempts when the opponent turns away. The finish mechanics are identical: cut the angle, hide the shoulder, squeeze.
Side triangle (top position)
Applied from a top position such as side control. You trap the opponent’s head and near arm between your legs and lock the figure-four from above. This works well after failed armlocks when the opponent exposes their arm and neck at the same time.
Mount triangle
From a high mount position, step one leg over the opponent’s arm and across their head. Lock the figure-four while staying on top. This is an intermediate-to-advanced variation. Get the closed guard version reliable first.
Flying triangle
You jump from standing and lock the triangle in mid-air. This is a competition move that requires perfect timing. High risk — do not attempt this casually in sparring without proper mat awareness.
High-percentage entries
From a failed armbar
One of the most reliable entries in BJJ. You attack the armbar from guard. Your opponent clasps their hands to defend. Instead of fighting the grip, kick your leg through the gap and convert directly to the triangle. The arm is already isolated — the transition takes less than a second with practice.
From spider guard
Start with a double sleeve grip in spider guard. Push your foot into the opponent’s bicep and attempt a sweep. As they post to defend, kick your leg over their shoulder and lock the triangle. The sweep threat and triangle threat share the same entry — stopping one opens the other.
From half guard
Your opponent is in your half guard trying to cross-face you. As their arm reaches forward, attack a pressing armbar. When they posture up to defend, their head comes forward — that is your moment to switch directly to the triangle.
From butterfly guard
Attack a sweep from butterfly guard. Your opponent posts their hand on the mat to stop the sweep. Overhook that arm and convert into the triangle. Defending the sweep creates the triangle entry, and vice versa.
Full combo chain: armbar → triangle → omoplata
Attack the armbar. They defend. Switch to the triangle. They stack or posture up. Transition to the omoplata. This three-way chain is a fundamental attacking sequence from closed guard. Each move sets up the next — your opponent cannot defend all three at once.
Gi vs no-gi: key differences
In the gi: You have collar grips available. A cross-collar grip breaks posture much faster than anything in no-gi. You can also use the lapel to drag the trapped arm across your centerline. The gi slows transitions slightly, giving you more time to adjust position before the opponent escapes.
In no-gi: No collar to grip. Posture control depends on overhooks, underhooks, two-on-one wrist control, and direct head control. You must break posture faster because opponents slide out more easily without gi friction. The angle cut becomes even more critical — if you do not rotate quickly, a strong opponent can stand up and stack you before the lock is tight.
Key no-gi adjustment: Replace the collar grip with a two-handed grip behind the head. Pull toward your hip rather than straight down. This generates the same posture-breaking effect without the gi.
In MMA: The triangle becomes both a defensive and offensive tool. When someone is in your guard throwing punches, the triangle forces them to stop striking and deal with the submission. This dual purpose makes it one of the most practical ground submissions in a real fight.
Combo chains
The triangle choke is most dangerous when your opponent knows it is coming and still cannot stop it. That is what combo chains do. Each submission you threaten opens the next one.
Triangle → Armbar
The most used combo in BJJ. Your opponent stacks or drives forward to escape. Their arm extends and their posture rises. Extend the isolated arm and pivot to finish the armbar. The arm is already separated from their body — apply downward pressure and finish.
Triangle → Omoplata
Any triangle position gives you an omoplata opportunity. When the opponent pulls their trapped arm free, use your top leg to sweep it downward and trap it at the shoulder. Rotate your hips toward their head and lock. See the full omoplata guide for finishing details.
Triangle → Rear naked choke
When the opponent turns away from the triangle to escape, follow their movement and take the back. From back control, apply the rear naked choke. Do not fight their escape — use it to reach an even stronger position.
Triangle → Sweep
If your opponent defends hard but you cannot finish, use the triangle as a sweeping platform. Their weight is forward and their base is compromised. A simple hip bump or bridge can put you on top with a dominant position.
Defense and counters
Posture from the start
The best triangle defense is prevention. Keep your back straight when inside someone’s guard. Keep elbows close to your body. Never let one arm get isolated and extended on one side of your body. If both arms stay between your opponent’s legs, the triangle entry is blocked.
Early posture recovery
The moment you feel one arm being pushed across — sit up hard and fast. Drive your hips forward. This breaks head control and creates space before the figure-four locks.
Stack defense
Drive their hips toward their face. Walk forward and lean your weight onto them. This kills the angle. Without the angle, the choke cannot complete. Be careful — a skilled practitioner will switch to the armbar when stacked.
Arm extraction
Once the triangle is locked, focus on getting the trapped arm out. Grip your own wrist with the outside hand and pull the elbow back to your body’s centerline. If the shoulder comes out from across their centerline, the choke pressure drops significantly.
Spinning escape
Turn your body in the same direction as the triangle. If you time the spin correctly, you can pass guard and escape the submission at the same time. This is an advanced escape that needs live repetition to develop the timing.
Common mistakes
- Not cutting the angle. The single most common mistake at every belt level. Cut to 90 degrees first — always. Never squeeze before you have the angle.
- Locking too low. If your lock sits across the jaw instead of behind the ear, there is no real pressure on the carotids. Lock high on the neck.
- Shoulder not hidden. The trapped shoulder must pass your centerline. If the elbow points outward, drag the arm further before squeezing. This one detail turns a 30% triangle into a 90% triangle.
- Squeezing with only the legs. Leg strength alone rarely finishes a strong opponent. The finish is a full combination: shin presses down, locking leg curls, hips rise, hands pull the head. All four at once.
- Releasing head control too early. The moment you let go of the head, your opponent can sit up, readjust their angle, and stack you. Maintain head control from the moment you lock the figure-four until the tap.
- Being passive in the hip explosion. The hip drive in Step 4 must be sharp and committed. A slow movement gives your opponent time to posture up and block the entry entirely.
Belt-level training guide
Understanding the BJJ belt system helps you set realistic expectations for where your triangle should be at each stage.
White belt — one entry, one finish
Learn the closed guard triangle only. Do not try variations yet. Focus entirely on the angle cut and the figure-four lock. Drill the setup 15 to 20 times per session before rolling. Make the hip explosion and angle cut automatic. Check the white belt guide for the fundamentals every beginner should build alongside this technique.
Blue and purple belt — multiple entries and combos
Add entries from spider guard, butterfly guard, and half guard one at a time. Practice the triangle-armbar combo until the switch is fully automatic under pressure. Start thinking in chains — your sweep threats should set up triangles, and your triangle threats should set up sweeps. The technique should work against resisting training partners regularly at this stage.
Brown and black belt — personalized system
Refine your angle cuts against live, active defense. Study how each opponent defends and adjust your shoulder position accordingly. Every elite practitioner has their own triangle system — a set of entries and chains that fits their body type and game. Build yours. For advanced study, John Danaher’s Danaher triangle system offers one of the most complete frameworks available.
Triangle choke in competition
The triangle choke has one of the highest completion rates of any submission in BJJ competition — approximately 38% when the position is properly established, among the highest of all submissions in gi competition.
Royce Gracie vs Dan Severn at UFC 4 in 1994 remains the most famous triangle finish in combat sports history — a 170 lb man submitted a 260 lb opponent from his back after nearly 15 minutes of being controlled. More recently, Gordon Ryan submitted an Olympic-caliber wrestler with a triangle in submission grappling. Paul Craig holds the record for the most triangle finishes in UFC history. Anderson Silva submitted Chael Sonnen with a triangle in Round 5 of UFC 117 — considered one of the greatest comebacks in MMA history.
Always check the IBJJF complete guide for your division’s rules before competing. The triangle choke itself is fully legal at all belt levels in both gi and no-gi IBJJF competition.
Triangle choke for self-defense
The triangle choke is a realistic self-defense tool for ground situations. If you end up on your back with an attacker on top, the triangle gives you a path to control and submission without needing superior size or strength.
The key self-defense entry is when the attacker reaches forward to strike. That extended arm is your opening. Isolate it, push it across their body, and drive your hips up to lock the triangle. The mechanics are identical to the sport version. The blood choke works on anyone regardless of what they are wearing.
Practice this from your back in every class. The closed guard is your ground self-defense foundation, and the triangle is one of its most reliable weapons.
Frequently asked questions
Is the triangle choke a blood choke or an air choke?
It is a blood choke. Done correctly, it compresses the carotid arteries on both sides of the neck simultaneously. It does not block the windpipe. Blood chokes are faster, more reliable, and require less squeezing force than air chokes.
How long does the triangle choke take to cause unconsciousness?
Research shows a properly applied triangle choke causes unconsciousness in approximately 9.5 seconds on average. Most opponents tap before that point because the pressure is immediate and obvious once the choke is tight.
Why does my triangle feel tight but my partner still does not tap?
Check the angle first — cut to 90 degrees. Then check the shoulder — pull the trapped arm fully across your centerline. Finally, check the lock height — it should be high on the neck behind the ear, not across the jaw. Squeeze with your hips rising, not just your knees closing.
Does the triangle choke work in no-gi?
Yes. Replace collar grips with two-handed head control or an overhook. The angle and shoulder mechanics are identical. No-gi requires faster transitions because there is no friction to slow the opponent’s escape.
What is the best counter to the triangle choke?
Prevention is the best counter. Keep posture upright, elbows close, and never let one arm get isolated on the same side as your opponent’s head. If the triangle is already locked, stack immediately, drive their hips toward their face, and work to extract the trapped arm.
Can a smaller person successfully triangle choke a much bigger opponent?
Yes. Your legs are far stronger than your opponent’s neck regardless of size differences. Correct positioning matters far more than strength. The entire design of the submission is built around using your strongest muscles against one of the body’s most vulnerable areas.
Should I learn the triangle before the armbar?
Learn both at the same time. They work together naturally. The armbar and triangle from closed guard are typically taught as a paired system — each submission opens the other when defended. Most coaches introduce both from white belt.
Quick reference
| Element | What to do |
|---|---|
| Posture | Break it before anything else |
| Arm position | One arm in, one arm out |
| Shoulder | Pulled fully across your centerline |
| Angle | Cut to 90 degrees before squeezing |
| Lock height | High on neck — behind the ear |
| Finish | Shin presses + leg curls + hips rise + pull head |
| Primary combos | → Armbar → Omoplata → Back take / RNC |
The triangle choke rewards consistent drilling more than almost any other submission in BJJ. The mechanics are not complicated. Getting them reliable under pressure takes repetition. Start with the closed guard entry, make the angle cut automatic, add entries one at a time, and build the combos gradually. In six months of regular practice, the triangle will be one of your most reliable weapons on the mat.
Mohsin has trained Brazilian jiu-jitsu for 6 years at Gracie Bara.
He has competed at IBJJF-affiliated tournaments and writes about BJJ
competition, gear, and athlete careers. He founded BJJ Sportswear
to help grapplers find quality equipment and information.